Gridsome 让开发人员可以轻松地构建静态生成的网站和应用程。
快速入门
- 安装
$ yarn global add @gridsome/cli- 创建项目
$ gridsome create my-gridsome-site
$ cd my-gridsome-site- 启动项目
$ yarn run develop项目配置
针对 gridsome.config.js 配置项讲解。
文件导出一个配置对象,例如:
module.exports = {
  siteName: 'Gridsome',
  siteUrl: 'https://www.gridsome.org',
  plugins: []
}
siteName
网站名称设置,默认取项目目录名称。
模板项目里默认有两个地方使用:
第一是页面
title,例如首页的页面标题默认是Hello, world! - Gridsome,这里的Gridsome就是取siteName的值。第二是布局组件,头部左边的链接文本,也就是通过
$static.metadata.siteName取值。siteDescription
网站描述设置,设置的值将作为
<meta name="description" content="" />的content值存在。pathPrefix
作为项目文根,即项目访问地址基本路径,只在生产环境下生效。
titleTemplate
页面
title文本格式,默认%s - <siteName>
其他查看 官方文档配置说明
Pages
创建页面有两种方式:文件系统和 Pages API
文件系统
按照规则创建文件自动生成路由配置,生成规则:
src/pages/Index.vue=>/src/pages/AboutUs.vue=>/about-ussrc/pages/about/Vision.vue=>/about/visionsrc/pages/blog/Index.vue=>/blogsrc/pages/user/[id].vue=>/user/:idsrc/pages/user/[id]/settings.vue=>/user/:id/settings
Pages API
在
gridsome.server.js配置:module.exports = function (api) { api.createPages(({ createPage }) => { createPage({ path: '/my-page', component: './src/templates/MyPage.vue' }) createPage({ path: '/user/:id(\\d+)', component: './src/templates/User.vue' }) }) }
如果使用动态路由,例如
[id].vue最终生成的文件名称叫_id.html,如果不希望是这样的名称可以去重写规则。
每个页面都可以有自己的 meta 信息,可以在页面组件 .vue 文件里设置:
export default {
  metaInfo: {
    title: 'Hello, world!',
    meta: [
      { name: 'author', content: 'John Doe' }
    ]
  }
}
集合
添加集合
在 gridsome.server.js 里添加集合数据
const axios = require('axios')

module.exports = function (api) {
    api.loadSource(async ({ addCollection }) => {
        // 添加集合数据,取名为 article,同时会自动生成 allArticle
        const collection = addCollection('article')

        // 预请求数据
        const { data } = await axios.get('http://jsonplaceholder.typicode.com/posts')

        // 将数据作为节点添加到集合里
        data.forEach(item => {
            collection.addNode(item)
        })
    })
}
在 GraphQL 查询数据
启动项目后会打印出这样的信息:
$ yarn run develop

Site running at:
  - Local:                 http://localhost:8080/
  - Network:               http://192.168.31.166:8080/

  Explore GraphQL data at: http://localhost:8080/___explore
其中 http://localhost:8080/___explore 就是 GraphQL 查询页面的地址,只有开发环境可以访问到。打开页面后可以看到这样的界面:

点击右侧的 “DOCS” 后可以看到这样的界面:
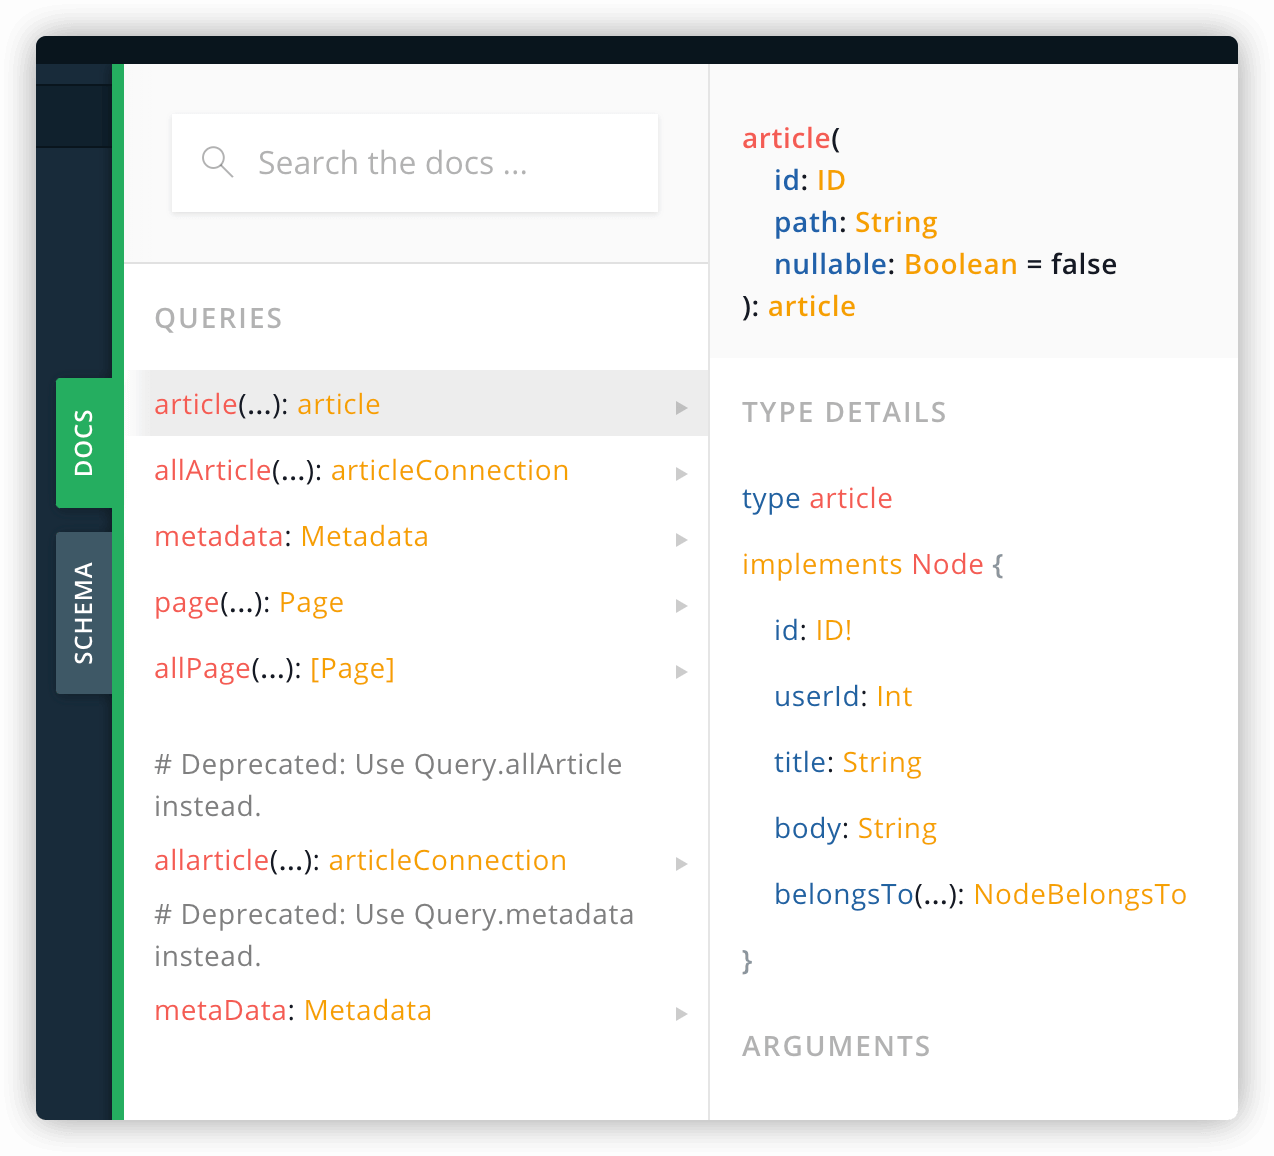
QUERIES 下是当前拥有的集合,article 和 allArticle 是刚才加的,其他几个是自带的。点击 article 可以看到集合的相关信息,其中 Node 里面就是集合项的数据结构。
article 的查询语句:
query {
    article (id: 1) {
        id
        title
        body
    }
}
allArticle 的查询语句:
query {
    allArticle {
        edges {
            node {
                id
                title
                body
            }
        }
    }
}
在页面中查询数据
创建 ./src/pages/ArticleList.vue 文件:
<template>
    <ul>
        <li v-for="article in $page.allArticle.edges" :key="article.node.id">
            <g-link :to="`/article-detail/${article.node.id}`">{{ article.node.title }}</g-link>
        </li>
    </ul>
</template>

<page-query>
query {
    allArticle {
        edges {
            node {
                id
                title
            }
        }
    }
}
</page-query>
添加一个跟 <template> 平级的标签 <page-query> ,在里面写 GraphQL 代码。这边直接将上一节的 allArticle 查询语句拷贝过来。
GraphQL 语句通过 this.$page 对象拿到查询到的数据,默认 this.$page里的数据结构跟 GraphQL 查询语句一样,变量名称也一样。例如查询的集合是 allArticle ,查询到的数据将放在 this.$page.allArticle ,如果想改成 this.$page.articleList ,可以给查询语句加上别名:
query {
    articleList: allArticle {
        edges {
            node {
                id
                title
                body
            }
        }
    }
}
使用模板渲染节点页面
对于文章详情页面,需要查询单条数据,这时候需要传入 ID 进行查询。想要让 GraphQL 里的集合接收到外部传来参数,需要给这个结合配置模板节点。配置模板节点就类似于配置路由一样,配置写在 gridsome.config.js 文件里,例如我准备需要开发一个文章详情页面,文章详情查的是 article 集合里的数据,配置如下:
module.exports = {
    templates: {
        article: [
            {
                path: '/article-detail/:id',
                component: './src/templates/ArticleDetail.vue'
            }
        ]
    }
}
templates 是用来配置模板节点的,template 下的 article 是集合名称,一个集合下可以配多个节点。节点的配置类似路由配置一样配置动态路由,配置 :id 就能在 GraphQL 里接收到名为 id 的参数。组件指向 src/templates 下的组件,src/templates 目录就是专门存放节点模板的,组件的写法跟一般的页面组件没什么区别,以下是组件代码:
<template>
    <div>
        <h3>{{ $page.article.title }}</h3>
        <p>{{ $page.article.body }}</p>
    </div>
</template>

<page-query>
query ($id: ID!) {
    article (id: $id) {
        title
        body
    }
}
</page-query>
参数在 query 上传递,$id 以 $ 开头表示这是一个变量,id 对应模板节点传过来的 id 。: ID 的写法跟 TypeScript 一样后面跟上参数的数据类型,ID 表示唯一值的数据类型,后面加上 ! 表示这是必填的。
article (id: $id) 是 GraphQL 中的语法,表示传入一个参数 id 值为 $id 的数据进行查询,$id 就是引入上面定义的变量。
分页处理
针对上面写的 ArticleList 页面的查询语句做调整:
-   query {
+   query ($page: Int)  {
-       allArticle {
+       allArticle (perPage: 10, page: $page) @paginate {
+           pageInfo {
+               currentPage
+               totalPages
+           }
            edges {
                node {
                    id
                    title
                }
            }
        }
}query接收$page数据allArticle传入perPage(每页数据量) 、page(当前第几页) 参数- 加入
@paginate指令,作用是将页面转成模板节点,使得$page能够接收到数据 - 查询数据添加
currentPage和totalPages数据,这两个数据是分页组件所必须的数据
Gridsome 为我们提供了分页组件,使用方式如下:
<template>
    <div>
        ...
        <Pager :info="$page.articleList.pageInfo" />
    </div>
</template>

<script>
import { Pager } from 'gridsome'

export default {
    components: { Pager }
}
</script>